
Zoho Mail Extension for Plesk
Posted by Nishi on 24 June 2025
Plesk is a web hosting platform with a control panel that allows domain owners to manage the different aspects of web hosting. Zoho Mail Plugin for Plesk helps you sign up for email hosting with Zoho Mail from within Plesk.
How to install Zoho Mail Extension for Plesk?
Zoho Mail Plugin for Plesk can be Installed from the Plesk Extensions page.
-
Login to your Plesk Dashboard.
-
Click on the Extensions tab from the left menu of the Plesk Dashboard.
-
Search for the Zoho Mail plugin and click Install.
Once the extension is installed, you can click on the Open button to begin using the extension.
Zoho Mail Setup
Once you open the extension, you can begin the setup process. The steps involved in the setup process will differ based on whether you are already a Zoho Mail user.

-
If you have not already signed up to a Zoho Mail account, click on the Get Started button under the Organization Sign up section.
-
If you already have a Zoho Mail account, click on the Continue button under the Existing Member section.
Organization Sign up
Step 1: Domain Selection
In this step, you need to register your domain with Zoho Mail.
-
On launching the plugin, Domain Selection page is opened.
-
From the Location and Select Domain drop-down, select the data center and domain you want to use, respectively, for email hosting with Zoho Mail.
-
Click Add Domain. You will be redirected to the Zoho Mail Domain Registration page.
-
Enter the following domain registration details and click Proceed.NameAdministrator account email addressMobile number associated with the accountPassword for the accountRegion
-
A summary of the registration will be displayed. Click Sign Up.
-
A verification code is sent to the registered mobile number. Enter the code and click Verify my mobile.


Note:
During this step, make sure you are not signed into any Zoho account in the browser you are using for the registration process.
Once the verification is successful, your domain registration step will be completed. You will be directed to the next step.
Step 2: User Authentication
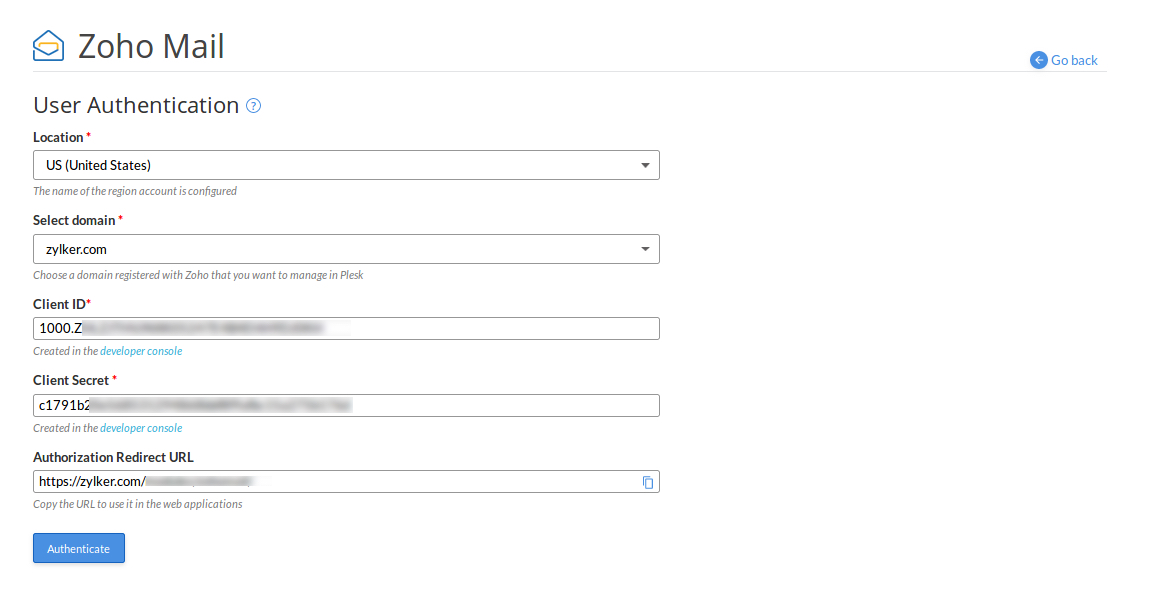
In this step, you need to authorize your Zoho Mail account in the User Authentication page.
-
Copy the Authorized Redirect URI provided on the User Authentication page.
-
Login to your Zoho Mail Account and access the Zoho Developer Console.
-
Click Add Client ID to create a new Client ID and Client Secret to access Zoho Mail API.
-
Provide the appropriate Client Name and Client Domain along with the copied Authorized Redirect URI and click Create.
-
You will then receive the Client ID and Client Secret.
-
Go to the plugin User Authentication page in the Plesk Dashboard to complete the process.
-
Enter the obtained Region, Client ID and Client Secret in this page.
-
Click Authenticate.
-
A consent screen asking permission to access your Zoho Account data is displayed. Click Accept.

Note:
If your account is part of the EU or IN data center, follow the below steps to obtain the appropriate Client Secret.
-
Once you have created the application in the Developer Console, click on the More Options icon across the corresponding Client ID and select Multi-DC.
-
Select the relevant DC to enable it. Click on the Client Secret link to obtain the DC specific Client Secret.


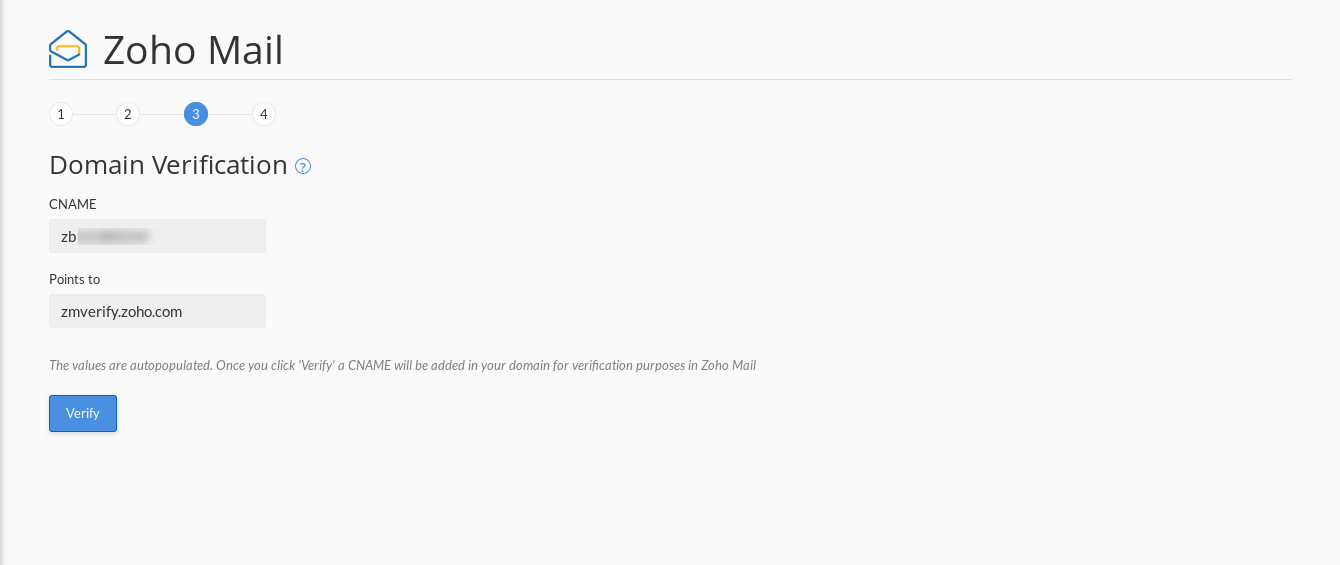
Step 3: CNAME verification
CNAME is used to verify your domain in Zoho Mail. In this step, the CNAME and the Points to field are auto-populated on successful completion of the previous step. Click on the Verify button to complete the domain verification process. Email hosting for your domain will be enabled once the domain is verified.
Note:
Domain verification generally takes effect in a short while. In some cases, it might take upto 48 hours to propagate.
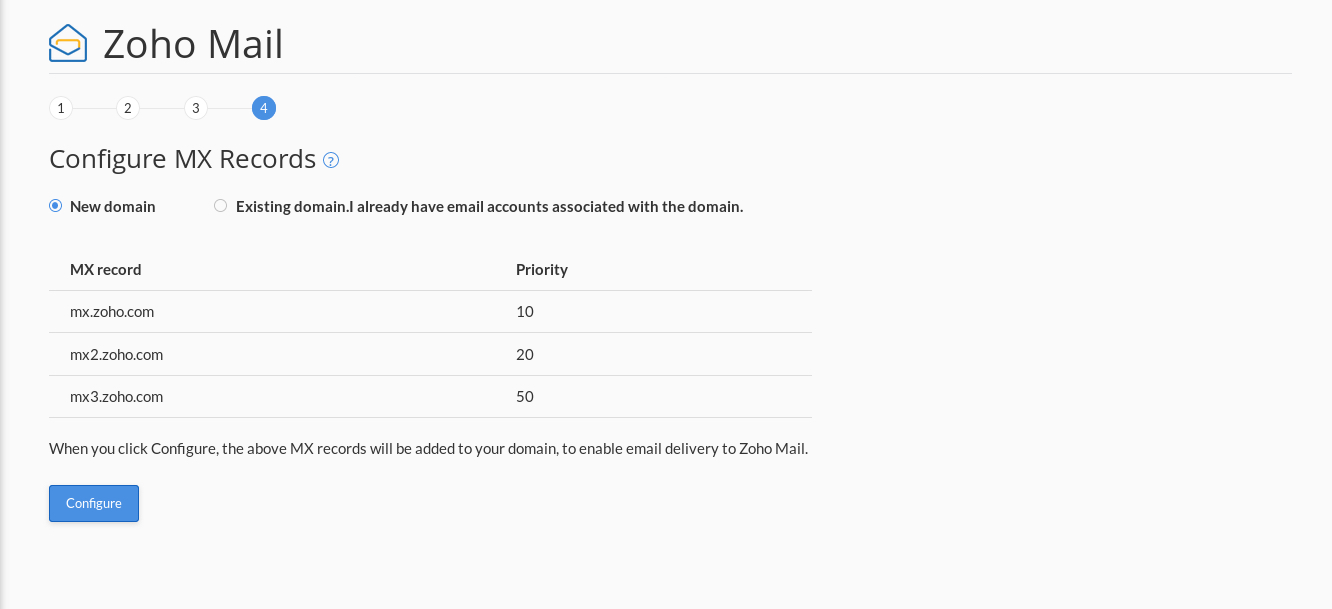
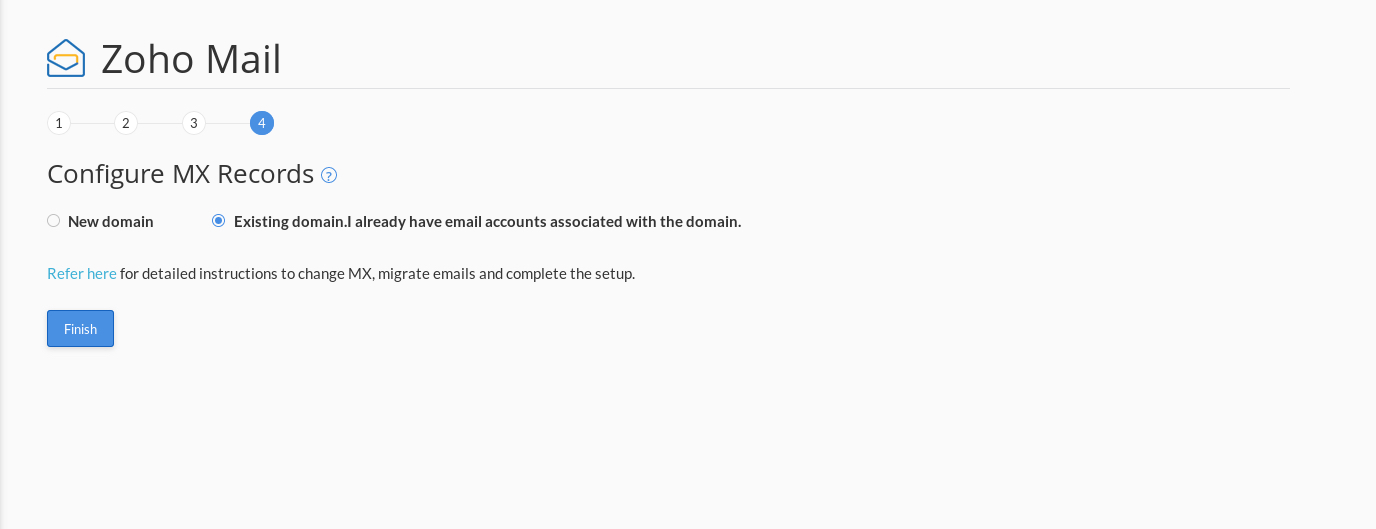
Step 4: Configure MX Records
Configuring MX records is a highly important process in order to receive the emails that are being sent to you. In this step, you need to choose one of the following option based on the status of your domain.
-
New Domain - For domain which has no prior email accounts associated to it.
-
Existing Domain - Domain which already has email accounts associated to it.
New Domain
If you choose the New Domain option, the required MX records are displayed. Click on the Configure button to point the listed MX records to your domain to enable email delivery.
Existing Domain
Since you already have other MX records pointed for your domain, you can proceed with the MX configuration step after you have added all the existing user to the Zoho Mail account. Click on the reference link for detailed instructions on how to proceed.
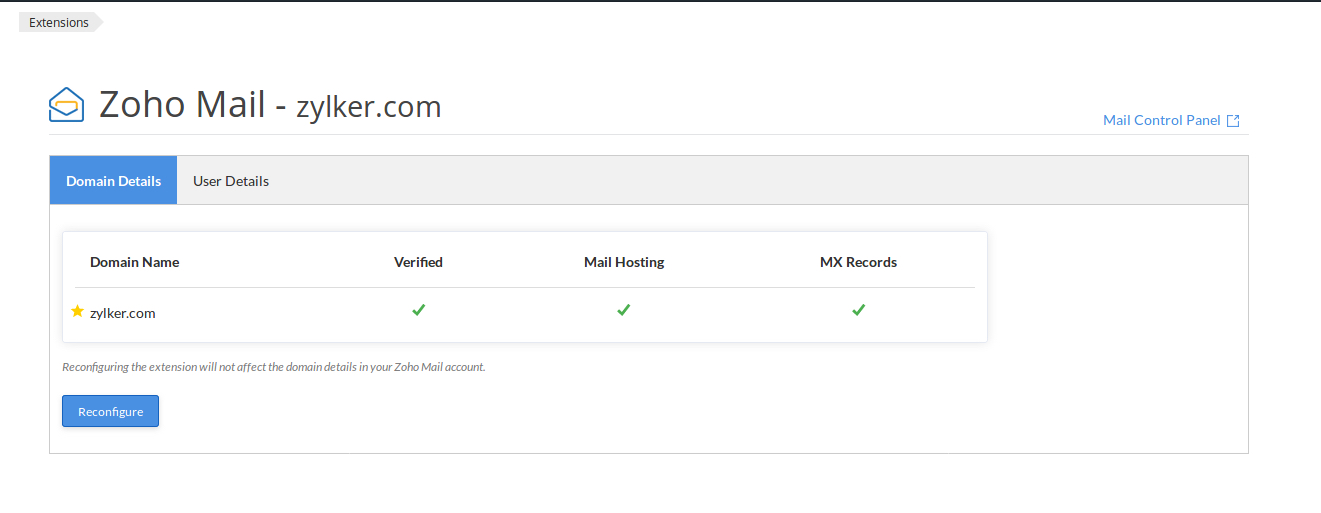
Step 5: User addition
In the final step of the setup process, you can view your domain details and also add users to your organization. Click on the Domain details tab to view the verification status of your domain.
Select the User Details tab to view the list of current users. Click on the Add users button to begin adding the required users.
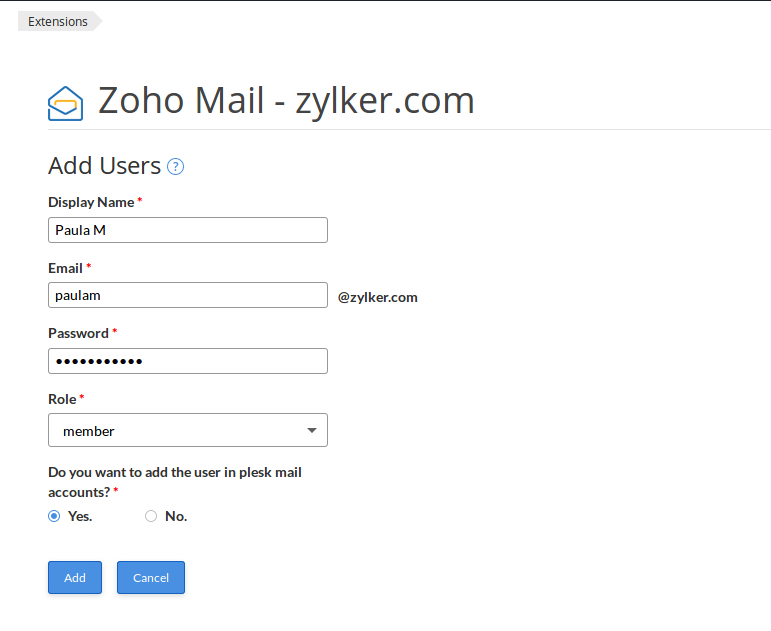
On clicking the Add Users button, the Add User page will open. Enter the Display Name, Email address, password and role of the user. Then click Add. Repeat till you add all the users and then click Cancel.
Note:
-
Select the YES radio button if you want the user to be added as a user in Plesk.
-
While you can currently only Sign Up for the Free plan from the Zoho Mail Extension for Plesk, you can later upgrade to a paid plan.
Existing Zoho Mail User
Step 1: User Authentication
In this step, you need to authorize your Zoho Mail account in the User Authentication page.
-
From the Location drop-down, select the region where your Zoho Mail account is hosted.
-
From the Select domain section, pick your domain.
-
Follow the steps in this section to obtain the Client ID and Client Secret using the Authorization Redirect URL given.
-
Once you've entered the correct Client ID and Client Secret, click Authenticate.
-
A consent screen asking permission to access your Zoho Account data is displayed. Click Accept.
Step 2: CNAME verification and MX configuration
In this step, you can verify CNAME and configure MX records for this domain. Choose whether you want to configure MX record for your domain with Zoho Mail using the radio buttons and then click Configure.
Once you click Configure, CNAME will be verified and MX record will be added for your domain in Zoho Mail. You can also check if the correct MX details are reflected in Zoho's MX record checker.
Step 3: User addition
Follow the same steps given in this section.
Was this article helpful?
Subscribe now & Get the latest updates
Zoho Mail Admin Console
Easily manage your organization's email accounts on the go with the Zoho Mail Admin app—available for both iOS and Android. This intuitive mobile console empowers administrators to handle user accounts, settings, and security with just a few taps.
Manage all your organization's email settings easily with the Zoho Mail Admin Console for streamlined control and performance.
👉 Learn MoreCustomize and manage Zoho Application Settings through the admin console for optimal app-level configurations.
👉 Learn MoreFollow the steps to install and configure the Zoho Mail Extension for Plesk, enabling webmail integration and domain-level control.
👉 Learn MoreEnsure GDPR compliance effortlessly by understanding how to handle Zoho Mail Data Subject Requests with step-by-step privacy protocols.
👉 Learn MoreOptimize user provisioning and deactivation workflows with the Zoho User Management Guide.
👉 Learn MoreDeploy the Zoho Mail Plugin for cPanel for centralized management and quick access to email features within your hosting panel.
👉 Learn MoreImplement eDiscovery & Email Retention features in Zoho Mail to meet legal and compliance requirements.
👉 Learn MoreLearn how to handle Zoho Mail & Workplace Subscription Management, including renewals, upgrades, and license allocation.
👉 Learn MoreControl access levels with Zoho Mail Roles & Privileges, defining what users and admins can see or do within the mail system.
👉 Learn MoreEnhance your organization’s inbox hygiene with Zoho Mail Spam Control Settings that block malicious content.
👉 Learn MoreConfigure your domain and users with this Zoho Email Hosting Setup Guide.
👉 Learn MoreUse the Zoho Mail Migration Wizard to transfer emails, users, and settings easily from other platforms.
👉 Learn MoreSet up IMAP Autodiscovery Settings in Zoho Mail for easier email client integration.
👉 Learn MoreDefine and apply Custom Email Policies in Zoho Mail that enforce organization-wide standards.
👉 Learn MoreAdjust Organization Email Settings in Zoho Mail for user preferences, default policies, and server-level configurations.
👉 Learn MoreSecure Zoho Mail access with the right Firewall Settings configuration using this comprehensive guide.
👉 Learn MoreGet an overview of organizational email performance with the Zoho Mail Organization Dashboard.
👉 Learn MoreResolve Domain Verification Failed in Zoho Mail by identifying possible causes and correcting DNS settings.
👉 Learn MoreStrengthen your organization’s protection using Zoho Mail Admin Console Security Settings.
👉 Learn MorePlan a successful Email Migration to Zoho Mail with minimal downtime and data loss.
👉 Learn MoreAvoid data loss with reliable Email Backup & Recovery in Zoho Mail, ensuring quick restore options.
👉 Learn MoreIntegrate Zoho Mail with Outlook via the Zoho Mail Outlook Add-In for improved productivity.
👉 Learn MoreStreamline team communication by creating Email Groups or Distribution Lists in Zoho Mail.
👉 Learn MoreUse the Zoho Mail Toolkit for admins to quickly resolve issues, perform diagnostics, and enhance configurations.
👉 Learn MoreTrack email security events through the Zoho Mail Security & Compliance Dashboard.
👉 Learn MoreLearn how to Search in Zoho Mail Admin Console using quick tips and tricks for efficient navigation.
👉 Learn MoreWhy Choose FGrade?
01
Migrations
FGrade handles seamless migrations to ensuring your data is transferred accurately and securely. Our successful track record speaks for itself.
02
Certified Experts
Our team comprises certified professionals with extensive training in all IT products. Trust us to manage your HR systems with the utmost expertise.
03
Great Price Discounts
At FGrade, we're ready to help you implement customizing workflows, setting up approvals all these at lower prices.
Discover how Fgarde can streamline your business
Reach out to the FGRADE Concierge Team for a free consultation!
Call Us
+91 916 056 5554
Mail Us
sales@fgrade.com

Search, compare & buy top business software with FGRADE. Find the best deals on Microsoft 365, Zoho, Google Workspace & more. Shop smart & save big!
Office Address
AWFIS, Ground Floor, DSL abacus it park, Survey Colony, Industrial Development Area, Uppal, Hyderabad, Telangana 500039