
How to import contacts?
Supported file format: CSV or XLSX only.Please convert all your files into a CSV/XLSX before attempting to import the data to your web application.
There are 4 important things that you'd need to know about when you import contacts from a CSV/XLSX file. They are described in detail below:
- Preparing your CSV/XLSX file
- Importing the file
- Mapping fields
- Reasons for failure of data import
Preparing your CSV/XLSX file
- Make sure that your CSV/XLSX file’s header row has a column that can be mapped to the field Email ID for the import to be successful.
- The file shouldn’t be larger than 5MB.
- If you'd like to automatically assign contacts to users, create a column with the email addresses of the users and map that column to the field Owner.
- If any field is a multi-select field, the values of the field should be separated by semicolon(;) in the CSV/XLSX file. Ex: Say the field, Competitors involved is a multi-select field. Competitor column in the CSV/XLSX should be:

- Note: The email address must be the email address that the user uses to sign in
mporting the file
Click the Contacts tab.
- In the contacts list view page, click the Import Contacts button.
- In the Import Contacts overlay, click Upload your contact CSV/XLSX file and browse through the files on your device to choose the desired file. Make sure the file format is CSV/XLSX.
- Once you have selected the file, you would see the file's name appear above the Remove button.
- If you'd like to replace the CSV/XLSX file, click Remove and start afresh.
- Once you've uploaded a CSV/XLSX file, choose one of two options:

- Create new contacts- This creates all the data from the CSV/XLSX file as new records.
- Create new and update existing contacts with or without overwriting.
- Identifies duplicates between the CSV/XLSX file and onboard records by matching them based on the following identifiers:Email* Record IDPhone number*Work Number
- Additionally, all fields of type ‘Text field’ and ‘Number’ will be automatically detected and can be used for matching.
*Note:
- When Email is used as an Identifier:
The email field in the CSV/XLSX will be matched only with the primary email of Lead/Contact for finding duplicates. Secondary email addresses, if any, will not be considered.
The CSV/XLSX file will be matched with both Leads and Contacts to identify duplicates.
If you are importing multiple emails for a Lead or Contact through the CSV/XLSX file, the first email in the cell will be considered as the identifier.
If the CSV/XLSX file has a single column for multiple emails wherein each email is column separated by semicolons, the first email will from each cell be used as the identifier for finding duplicates.
- When Phone number is used as an Identifier: Only if there is an exact match between the field value on the CSV file and the stored record will the record be considered duplicate. Example: if a record on contains 9003241245 and the CSV file has a record containing phone number as +1-9003241245, then the two records will not be considered duplicates.
- Decide what to do with records that are identified as duplicates:Skip import for all duplicate recordsYou can opt to skip import for all duplicate records. This will prevent the web application from updating records that are already present. You will also receive an import summary email with a CSV file containing all the skipped records.Update all duplicate records- With Overwrite: Updates all the fields and overwrites the values present in the fields.- Without overwrite: Updates only fields that are empty.
- Pick a date format: Choose the date format for all date fields present on your CSV/XLSX file. You can choose between one of the following three formats:- DD/MM/YYYY- MM/DD/YYYY- YYYY/MM/DD
- Manage marketing lists and email subscriptions: Choose the subscription status and types Click the checkbox to subscribe your contacts to emails. Make sure that your leads have consented to receive emails from your organization.
- Manage sales owner and lifecycle stage: Choose a user who will be assigned as an owner for all records that are unassigned i.e the owner field is left empty on the CSV/XLSX file. You can also add the lifecycle stage to assign to the contacts.
6. When you’re good to go, click Next to map the fields.
Mapping fields
The overlay Map Columns to Fields that you now see is exclusively for mapping the columns in your CSV/XLSX file with the fields available. A contact’s data from your file is displayed alongside the respective headers to help you map the fields better.
Note: The field Emailmust be mapped for the import to be complete.

Importing the file
Click the Contacts tab.
- In the contacts list view page, click the Import Contacts button.
- In the Import Contacts overlay, click Upload your contact CSV/XLSX file and browse through the files on your device to choose the desired file. Make sure the file format is CSV/XLSX.
- Once you have selected the file, you would see the file's name appear above the Remove button.
- If you'd like to replace the CSV/XLSX file, click Remove and start afresh.
- Once you've uploaded a CSV/XLSX file, choose one of two options:
- Create new contacts- This creates all the data from the CSV/XLSX file as new records.Create new and update existing contacts with or without overwritingIdentifies duplicates between the CSV/XLSX file and onboard records by matching them based on the following identifiers:Email* Record IDPhone number*Work Number
- Additionally, all fields of type ‘Text field’ and ‘Number’ will be automatically detected and can be used for matching.
*Note:
- When Email is used as an Identifier:
- The email field in the CSV/XLSX will be matched only with the primary email of Lead/Contact for finding duplicates. Secondary email addresses, if any, will not be considered.
- The CSV/XLSX file will be matched with both Leads and Contacts to identify duplicates.
- If you are importing multiple emails for a Lead or Contact through the CSV/XLSX file, the first email in the cell will be considered as the identifier.
- If the CSV/XLSX file has a single column for multiple emails wherein each email is column separated by semicolons, the first email will from each cell be used as the identifier for
- When Phone number is used as an Identifier: Only if there is an exact match between the field value on the CSV file and the stored record will the record be considered duplicate.
- Example: if a record on contains 9003241245 and the CSV file has a record containing phone number as +1-9003241245, then the two records will not be considered duplicates
- Decide what to do with records that are identified as duplicates:Skip import for all duplicate recordsYou can opt to skip import for all duplicate records. This will prevent the web application from updating records that are already present. You will also receive an import summary email with a CSV file containing all the skipped records.Update all duplicate records- With Overwrite: Updates all the fields and overwrites the values present in the fields.- Without overwrite: Updates only fields that are empty.
- Pick a date format: Choose the date format for all date fields present on your CSV/XLSX file. You can choose between one of the following three formats:
- - DD/MM/YYYY
- - MM/DD/YYYY
- - YYYY/MM/DD
- Manage marketing lists and email subscriptions: Choose the subscription status and types Click the checkbox to subscribe your contacts to emails. Make sure that your leads have consented to receive emails from your organization.
- Manage sales owner and lifecycle stage: Choose a user who will be assigned as an owner for all records that are unassigned i.e the owner field is left empty on the CSV/XLSX file. You can also add the lifecycle stage to assign to the contacts.
7. After you’re done mapping the fields, hit Import.

If your CSV/XLSX file is small, the import is instantaneous and you can see a green label that gives you the number of successful imports. If you’ve checked the Update checkbox, then you can also know the number of contacts that were updated during the import.
If your CSV/XLSX file is small, the import is instantaneous and you can see a green label that gives you the number of successful imports. If you’ve checked the Update checkbox, then you can also know the number of contacts that were updated during the import.
If the CSV/XLSX file is large, you would receive an email that gives you the same data when the import is complete.
Where can I see my imported contacts?
You can view all the imported contacts under the New Contacts view.
Why did some of my data not get imported?
These could be the possible reasons why some of your data was not imported.
- Invalid email address - If the email addresses in your CSV/XLSX file aren’t of the proper format (e.g: johndoe@sales , johndoe.com)
- Duplication - If a contact’s email address is already present in the system, that contact is skipped. This is because each contact must have a unique email address.
- Unmapped Columns - Columns that aren’t mapped with any of the field.
- Improper Field Type - If the field type is different from the type of value in the column.
- Picklist Values - If you’re mapping a column with values for a picklist (such as Radio button/Checkbox/Dropdown menu) with a field (also a picklist), you need to be double-check that the values in the column match with the choices of the field (picklist).For e.g : If you’ve got a column that has the values 1, 2, 3 for the Number of contacts attempted and want to map it to a radio button (field), make sure that that radio button has 1, 2, 3 as the field’s choices.
Admins can set limits for users on how many records they can import and update for the day.
Note: Import limit can be set only for Contact/Account/Deal modules and not custom modules
To configure this,
Go to Admin Settings > Roles > Choose a role (say Sales User)
Under Permissions > Actions, set the limit for creating and updating records during import

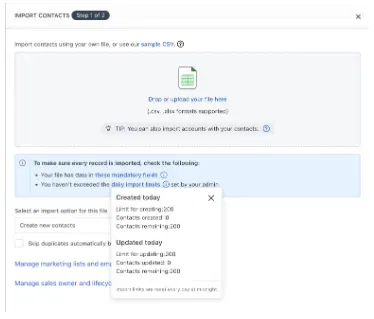
Sales users will be presented with a note during import that informs them not to exceed the import limit set by the admin

Clicking on the information symbol would fetch more details regarding the import
Sales users will be presented with a warning message on exceeding import limits. The import functionality will also be disabled for that day.

If the sales user tries to exceed the import limit, an error message will be thrown and records will not be created.

The import history page that you would land on after every import gives you insights into the records that were imported and skipped.

All-in-One Sales Automation with Freshsales
Freshsales is a comprehensive sales force automation platform designed to empower sales teams. It offers all the essential tools needed to attract and engage high-quality leads.
1. Optimize Freshsales for Growth
Streamline your sales process and scale business success with Freshsales CRM.
👉 Optimize Your CRM Now2. Social Media Sales Strategy
Use Freshsales insights to convert your social followers into paying customers.
👉 Boost Sales with Social Insights3. Freshsales Promotions Advantage
Launch and track promotions that drive conversions using Freshsales.
👉 Run Smarter Campaigns4. Freshdesk + Freshsales Integration
Unify support and sales with easy app integrations.
👉 Connect Your Tools5. Import Contacts to CRM
Bring in your existing contacts without hassle or data loss.
👉 Start Contact Import6. Manage Multiple Emails per Contact
Handle leads with multiple emails effectively in Freshsales.
👉 Enhance Contact Profiles8. Lifecycle Stage Management
Track contact progression to boost conversion rates.
👉 Manage Stages Efficiently11. Customize the Freshsales UI
Tailor the CRM interface to match your team’s workflow.
👉 Personalize Your CRM12. Capture Website Visitors
Convert more visitors with smart data capture tools.
👉 Increase Website Conversions13. Custom Contact Fields
Create unique contact fields to fit your business needs.
👉 Add Custom Fields14. Freshsales Automation Tools
Automate repetitive tasks and increase productivity.
👉 Set Up Automation17. Buy Phone Numbers via CRM
Access local and toll-free numbers within Freshsales.
👉 Get Numbers Today19. Clone Contacts in Clicks
Speed up data entry by cloning existing contact records.
👉 Clone a Contact25. Organization Settings & SSO
Improve login security and ease with SSO configuration.
👉 Secure Your CRM26. Track Sales Emails
Know when prospects open and engage with your messages.
👉 Monitor Email Engagement28. Quote & Pricing Configuration
Align your sales quotes and documents with CRM deals.
👉 Configure CPQ Tools29. Explore All Freshsales Features
Get the most from Freshsales with FGRADE’s expert resources.
👉 Explore Freshsales NowWhy Choose FGrade?
01
Migrations
FGrade handles seamless migrations ensuring your data is transferred accurately and securely. Our successful track record speaks for itself.
02
Certified Experts
Our team comprises certified professionals with extensive training in all IT products. Trust us to manage your HR systems with the utmost expertise.
03
Great Price Discounts
At FGrade, we're ready to help you implement customizing workflows, setting up approvals all these at lower prices.
Discover how Freshsales can streamline your business
Reach out to the FGRADE Concierge Team for a free consultation!
Call Us
+91 916 056 5554
Mail Us
sales@fgrade.com

Search, compare & buy top business software with FGRADE. Find the best deals on Microsoft 365, Zoho, Google Workspace & more. Shop smart & save big!
Office Address
AWFIS, Ground Floor, DSL abacus it park, Survey Colony, Industrial Development Area, Uppal, Hyderabad, Telangana 500039