
What are sales sequences? How to configure a sequence?
This feature will allow you to set up automated email sequences, personalize emails, track the effectiveness of the sequence and follow up with prospects based on their behavior.
In this guide, we will talk about
- Who can access sales sequences
- Limits and Scope
- Types of sales sequences
- Overall flow of a sales sequence
- Execution of a sales sequenceImport your audience
- Create your first sequence
1. Who can access Sales Sequences?
Users with 'View Sales Sequences' permissions enabled on their roles can access Sales Sequences. However, to create a sequence, the user should have 'Create Sales Sequences' permission enabled.
Recommended: Users should connect their emails to send emails using their custom SMTP for better deliverability.
2. What are the limits and scope?

Email limits specific to sales sequence emails are given below -

Sales sequences have user scope. This means users will be able to view and edit only their sequences.
3. Type of sales sequence
There are two types of sequence -
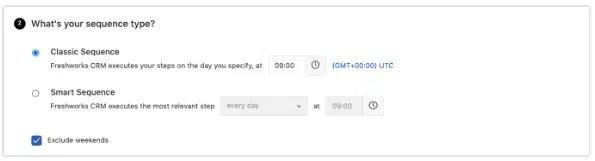
- Classic Sequence: Classic sequence allows you to automatically run a sequence of actions for a set of audiences on specific days. A typical example would be of a prospecting campaign for an outbound sales team wherein the sales agent sends a set of emails and adds follow-ups on specific days till the prospect responds.

- Smart Sequence: Smart sequence allows you to automatically run the most relevant steps at fixed intervals in the sequence based on the behavior of the audience. An example of Smart Sequence would be customer onboarding or retention sequence where the sales agent wants to send an email based on what the audience has done or not. This will send the relevant email at the right time.

4. Overall flow of Sales Sequence

- Define Audience: The audience is a set of contacts, or accounts, who will enter the sequence. You can add filter conditions on the property of contacts to add them as an audience. When accounts are added, all related contacts whose primary sales account matches the conditions will be added to the sequence. Additionally, you can also add saved views to the sales sequence.
- Choose sequence type: Choose a type between Classic sequence and Smart sequence depending on whether you want to run the sequence based on time or based on behavior.
- Add steps to be executed: Steps are the actions to be performed as part of the sequence. There are 4 types of actions that can be done - Add Email, Add Call Reminder, Add Follow up, and Add SMS. These actions will be executed when the conditions of the step match.
- Define exit criteria: Exit criteria is the set of condition to match for contacts, or accounts to exit the sequence at any point.
5. Execution of sales sequence
- A sales sequence will run at a specified time/interval at the given time and timezone. The entry conditions will be checked every time the sequence runs to add a new audience. The metrics will be updated at the same time.
- In classic sequence, if a step condition is not matched and the specific step is not executed, the contact will continue to run in the sequence by skipping the step and executing the next step at the next specified day.If an email template is modified in a step, the sequence will send the modified email the next time it runs. The same applies to modified step conditions or day.All sales sequence are independent. If sequence A is running on a specific contact, sequence B can also run on the same sequence unless specified explicitly.
6. Import your sequence audience
You can either filter the contacts or accounts already present in the or import your audience list before creating a sequence. Refer to our solution articles to import contacts and accounts
Recommended: Create a custom field such as ‘SDR sequence’ or ‘Import Name’ and populate a tag for every import you do. This will help you identify your records easily and add to audience criteria. You can also make use of the sequence default field.
7. Create your first sequence
Usecase - Run a sequence to qualify a contact in outbound sales. A set of emails sent and follow-ups are done on specific days until the prospect responds back.
This is a typical use case of a classic sequence.
- To create a new sequence, click the quick add button on the top navigation bar and click Create Sales Sequence.

You can also access the sales sequences from Profile settings > Sales sequence. This is the list view for all your sequences. Click the

button on the top right side.

- Give a name to your sales sequence. This name will be used in the filters to get the list of contacts in a particular sequence.
- Next, define your audience. Choose the record (Contact or Account) on which you want to run the sequence. To add records to the campaign, you can choose one of two ways.
- Choose filtered views to add to the campaignYou can preselect from a list of contact views on which the campaign must run. Give a name to your sales sequence. This name will be used in the filters to get the list of contacts in a particular sequence.
Next, define your audience. Choose the record (Contact or Account) on which you want to run the sequence. To add records to the campaign, you can choose one of two ways.

- Set filter conditions to detect and add records to a campaignIf none of the contact views suit your requirements, you can add specific contacts, or accounts, to the campaign by setting up filter conditions.Click 'Add by conditions'. This brings up the filter conditions overlay.

You can add up to 8 filter conditions.

If your 'email address' field has not been made unique, click the checkbox to prevent duplicates from being added to the Sales Sequence.

Note:In the absence of entry conditions, the steps will be executed for only those Contacts/Accounts that are manually added to the sequence.
- Choose the sequence type. The prospecting emails will go on specific days so it is best to choose Classic sequence. Select the time and timezone when the emails should go to the audience. This timing is used for all steps.
- You can also choose to exclude weekends from the campaign by selecting the checkbox.
- Next, you add the steps to be executed. There are 5 types of actions we support. You can Add EmailAdd Email reminderAdd Follow up Add Call reminderAdd SMS
- Add Email
- Add Email reminder
- Add Follow up
- Add Call reminder
- Add SMS

- To add an email step, click on Add Email. This will open an overlay to add the email.
- Select the day you want to send the email.
- You can add conditions to execute the step. These conditions can be on email activity or record property. You can add up to 8 conditions.
- Select the email template to be sent. You can personalize the emails by using placeholders in your email template. Learn more about email templates.
- You can further customize the email step under Advanced Settings.You can:- Send the email as a new thread or choose to send it as a reply to the previous step.- Choose the From, Reply to, CC, and BCC information- Track the opens and clicks- Include a link to unsubscribe
- To personalize or review your emails before sending them, click on Email reminder to open up an overlay to add an email reminderYou will be able to view the list of reminders in the activities dashboard. You can filter to find a particular email and personalize it before sending it across. You can also view the reminders in the contact details page
- To add a follow-up step, click on Add Task. This will open an overlay to add the follow-up.
- Similarly, you can add a Call reminder as below.
- You may also choose to send SMS in the following manner.
6. Define exit criteria: There are 4 default conditions for a contact, or account to exit the sequence. Click the checkbox to enable the conditions.
- All the steps are executed
- When the contact replies to the email
- When the contact has unsubscribed
- Email has bounce
Additionally, you can also add the filter conditions based on the properties to further select the specific contacts or accounts you want to run the sequence on.

Note: You can add upto 8 filter conditions.
Important fields:
‘Last contacted mode’ is a field that captures information about the last activity done with the contact, or account. This can be ‘Not yet contacted’, ‘No reply’, ‘Opened but no reply’, ‘Replied’, ‘Incoming call’, ‘Outgoing call’, ‘Chat’, ‘Sales Activity’.
Similarly, the ‘Last Activity Type’ is another field that captures information about the latest activity type that involved the contact. This could be any of the default activities– Call, Phone, Chat, Task, SMS, or Meeting– or any custom sales activity such as Lunch, Coffee, InMail etc.
All-in-One Sales Automation with Freshsales
Freshsales is a comprehensive sales force automation platform designed to empower sales teams. It offers all the essential tools needed to attract and engage high-quality leads.
1. Optimize Freshsales for Growth
Streamline your sales process and scale business success with Freshsales CRM.
👉 Optimize Your CRM Now2. Social Media Sales Strategy
Use Freshsales insights to convert your social followers into paying customers.
👉 Boost Sales with Social Insights3. Freshsales Promotions Advantage
Launch and track promotions that drive conversions using Freshsales.
👉 Run Smarter Campaigns4. Freshdesk + Freshsales Integration
Unify support and sales with easy app integrations.
👉 Connect Your Tools5. Import Contacts to CRM
Bring in your existing contacts without hassle or data loss.
👉 Start Contact Import6. Manage Multiple Emails per Contact
Handle leads with multiple emails effectively in Freshsales.
👉 Enhance Contact Profiles8. Lifecycle Stage Management
Track contact progression to boost conversion rates.
👉 Manage Stages Efficiently11. Customize the Freshsales UI
Tailor the CRM interface to match your team’s workflow.
👉 Personalize Your CRM12. Capture Website Visitors
Convert more visitors with smart data capture tools.
👉 Increase Website Conversions13. Custom Contact Fields
Create unique contact fields to fit your business needs.
👉 Add Custom Fields14. Freshsales Automation Tools
Automate repetitive tasks and increase productivity.
👉 Set Up Automation17. Buy Phone Numbers via CRM
Access local and toll-free numbers within Freshsales.
👉 Get Numbers Today19. Clone Contacts in Clicks
Speed up data entry by cloning existing contact records.
👉 Clone a Contact25. Organization Settings & SSO
Improve login security and ease with SSO configuration.
👉 Secure Your CRM26. Track Sales Emails
Know when prospects open and engage with your messages.
👉 Monitor Email Engagement28. Quote & Pricing Configuration
Align your sales quotes and documents with CRM deals.
👉 Configure CPQ Tools29. Explore All Freshsales Features
Get the most from Freshsales with FGRADE’s expert resources.
👉 Explore Freshsales NowWhy Choose FGrade?
01
Migrations
FGrade handles seamless migrations ensuring your data is transferred accurately and securely. Our successful track record speaks for itself.
02
Certified Experts
Our team comprises certified professionals with extensive training in all IT products. Trust us to manage your HR systems with the utmost expertise.
03
Great Price Discounts
At FGrade, we're ready to help you implement customizing workflows, setting up approvals all these at lower prices.
Discover how Freshsales can streamline your business
Reach out to the FGRADE Concierge Team for a free consultation!
Call Us
+91 916 056 5554
Mail Us
sales@fgrade.com

Search, compare & buy top business software with FGRADE. Find the best deals on Microsoft 365, Zoho, Google Workspace & more. Shop smart & save big!
Office Address
AWFIS, Ground Floor, DSL abacus it park, Survey Colony, Industrial Development Area, Uppal, Hyderabad, Telangana 500039